Sharing Screenshots on the Mac Using OneDrive for Business
For quite a while Dropbox has had a great screenshot-sharing feature that will automatically move any screenshots you take using ⇧⌘3 and ⇧⌘4 into your Dropbox Screenshots folder and immediately copy its public URL to your clipboard. It can be great for quickly & effortlessly sharing screenshots with others via IM, email, etc.
But what if you work for a Microsoft-centric, Office 365, SharePoint-y organization? They usually don’t take kindly to having proprietary screenshots stored on personal Dropbox or Google Drive accounts, possibly shareable with anyone in the world that you give the URL to - willingly or otherwise. And - here’s the kicker - what if you also dare to use a Mac in such an environment?
Until recently, the answer has been to email the images, attempt a futile file transfer via Adium or Microsoft Lync, schlep around in the OneDrive web application, or put them on a network share and try to communicate that path to someone else in a platform-agnostic way. Because although Microsoft OneDrive has been in the Mac App Store for a while, it doesn’t work with business accounts. Furthermore, Microsoft didn’t even make a OneDrive for Business client for the Mac.
On January 28, 2015, Microsoft finally released what they call the “OneDrive for Business Mac sync client Preview”. Notice the words “sync client” - because that’s all the client does at this time: sync files. No Finder integration. No Share Extensions. No special screenshot-handling. No easy copying of sharable URLs. It just creates a directory on your disk, keeps it in sync with the files and folders in your OneDrive for Business account, puts a nice little cloud in your menu bar, and animates it when it’s syncing. It’s not exactly what I had hoped for, but it certainly beats the web app and failed IM file transfers. And hey, it’s just a “preview”, right?
Fortunately, OS X provides plenty of built-in tools to help Mac users fill in much of the missing functionality. In this post, I’ll show how to create a few Automator workflows to allow you to:
- take a screenshot and have its sharable OneDrive URL automatically copied to your clipboard.
- copy the sharable URL of any file in your OneDrive folder in Finder.
A word of warning: I’m not an MCSE. I have no idea whether any of this will work for you in your business’s network environment or with its particular Office 365 subscription. This is just what happened to work for me.
Setup
Installing OneDrive for Business for Mac
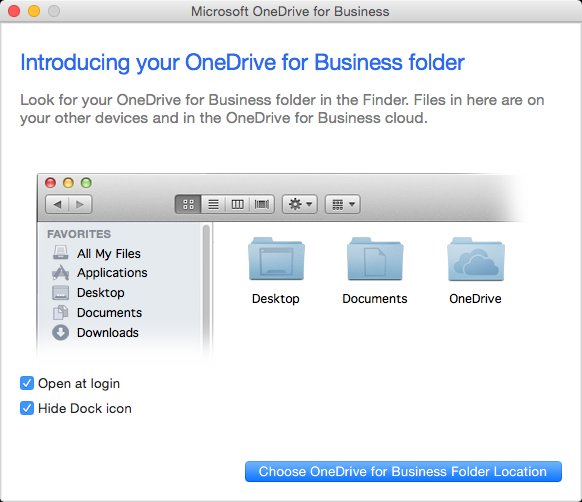
Of course step 0 is to install the “OneDrive for Business Mac sync client Preview”. It’s a very straightforward process, at least at my organization. Just follow the setup wizard. Note that when you click on the Choose OneDrive for Business Folder Location button, you can pick any folder you want, but I chose the Documents folder.[1] All the following instructions will assume the OneDriveBusiness folder is located at ~/Documents/OneDriveBusiness.
Creating The Screenshots Folder
By default, my OneDrive contained a Shared with Everyone folder. Any files I place in this aptly-named folder can be viewed by any authenticated user in my organization, which is fine by me.[2] Create a subfolder inside it named Screenshots.

I don’t currently use any fancy 3rd-party software for taking screenshots. The built-in OS X keyboard shortcuts work fine for me. However it always saves to the Desktop, and there’s no visible UI for changing this. Fortunately, as is often the case, even the most annoying of OS X’s defaults can be changed from the terminal with the defaults write command. In this case, run the following, changing the path to match the path to your Screenshots directory.[3]
defaults write com.apple.screencapture location -string "/Users/pjfry/Documents/OneDriveBusiness/Shared with Everyone/Screenshots"
Next you’ll either need to log out and back into your OS X account or run the scary killall SystemUIServer terminal command to make the new screenshot location take effect. Afterwards, all the screenshots you take should be written straight into the Screenshots folder you created in OneDrive and synced to the cloud.
Finding Your OneDrive Company ID and User ID
We need to find what I’m going to call the “company ID” and “user ID” that OneDrive uses to generate the URLs to your shared files.[4] Start by putting at least one file in your screenshots directory.
Next, open the OneDrive web app. One easy way to do that is to click the OneDrive menu bar icon, then click View Files in Browser.

Once you log in, navigate to the file you just added to the screenshots directory.

Click the ellipsis icon beside the file. A popover will appear showing a preview of the image, the share URL, and some actions you can perform on the file.

Copy the URL near the bottom of the popover and paste it into a text editor where you can get a better look at it. It should look something like this:
https://planetexpress-my.sharepoint.com/personal/pjfry_planetexpress_earth/Documents/Shared%20with%20Everyone/Screenshots/Screen%20Shot%202015-02-07%20at%2012.21.07%20PM.png
The first highlighted portion of the URL above is what I am calling the company ID - in this case planetexpress. The second highlighted portion is what I call the user ID - in this case pjfry_planetexpress_earth.[5] Make a note of these, since we’ll be needing them when creating the Automator shell script actions below.
Automator Workflows

These Automator workflows themselves are super-simple. The hard part is taking a file’s path from your local filesystem and generating its corresponding OneDrive URL. So these are basically glorified Ruby scripts wrapped in an Automator workflow that provides the script with the file path input and copies its URL output onto your clipboard.
Creating a “OneDrive Screenshots” Folder Action
This first workflow is a folder action that watches your Screenshots directory for a new file, opens the file the Preview, generates the file’s shared URL, and puts the URL on your clipboard.
Start by opening Automator.app and creating a new Folder Action.

In the newly-created folder action workflow, do the following:
- Set Folder Action receives files and folders added to to your Screenshots folder.
- Optionally, add an Open Images in Preview action. When the workflow is triggered, this action will immediately open any screenshot you take in Preview. You can leave this action out or disable it if you don’t find it useful.[6]
- Add a Run Shell Script action.
- Change the Shell dropdown to “/usr/bin/ruby”.
- Change the Pass input dropdown to “as arguments”.
- Paste this ruby script into the text area of the Run Shell Script action, changing
[YOUR COMPANY ID FROM SHAREPOINT URL]to your company ID and[YOUR USER ID FROM SHAREPOINT URL]to your user ID. - Add a Copy to Clipboard action.

Now save it as something like “OneDrive Screenshots”. If everything was done correctly, it should start working immediately. To try it out:
- Take a screenshot with ⇧⌘3 or ⇧⌘4.
- Preview should open the image.
- The shareable URL should be on your clipboard now, so paste it into a browser to try it out.
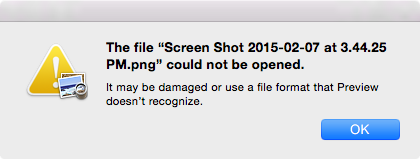
Beware: The URL will not work until OneDrive is done syncing the file to the server, i.e. until the little cloud animation in the menu bar starts & stops again.[7] So if OneDrive is too slow or you are really quick, opening the URL in a browser may seem to trigger a download, but attempting to open the downloaded file will produce an error.
If something seems broken or nothing happens, try adding a Get Selected Finder Items action to the beginning of your workflow. This will allow you to run the workflow from within Automator so you can debug the workflow using whatever file you have most recently selected in Finder as the input. Automator should give you some vague indication of where things are falling apart. Don’t forget to disable Get Selected Finder Items when you’re done.
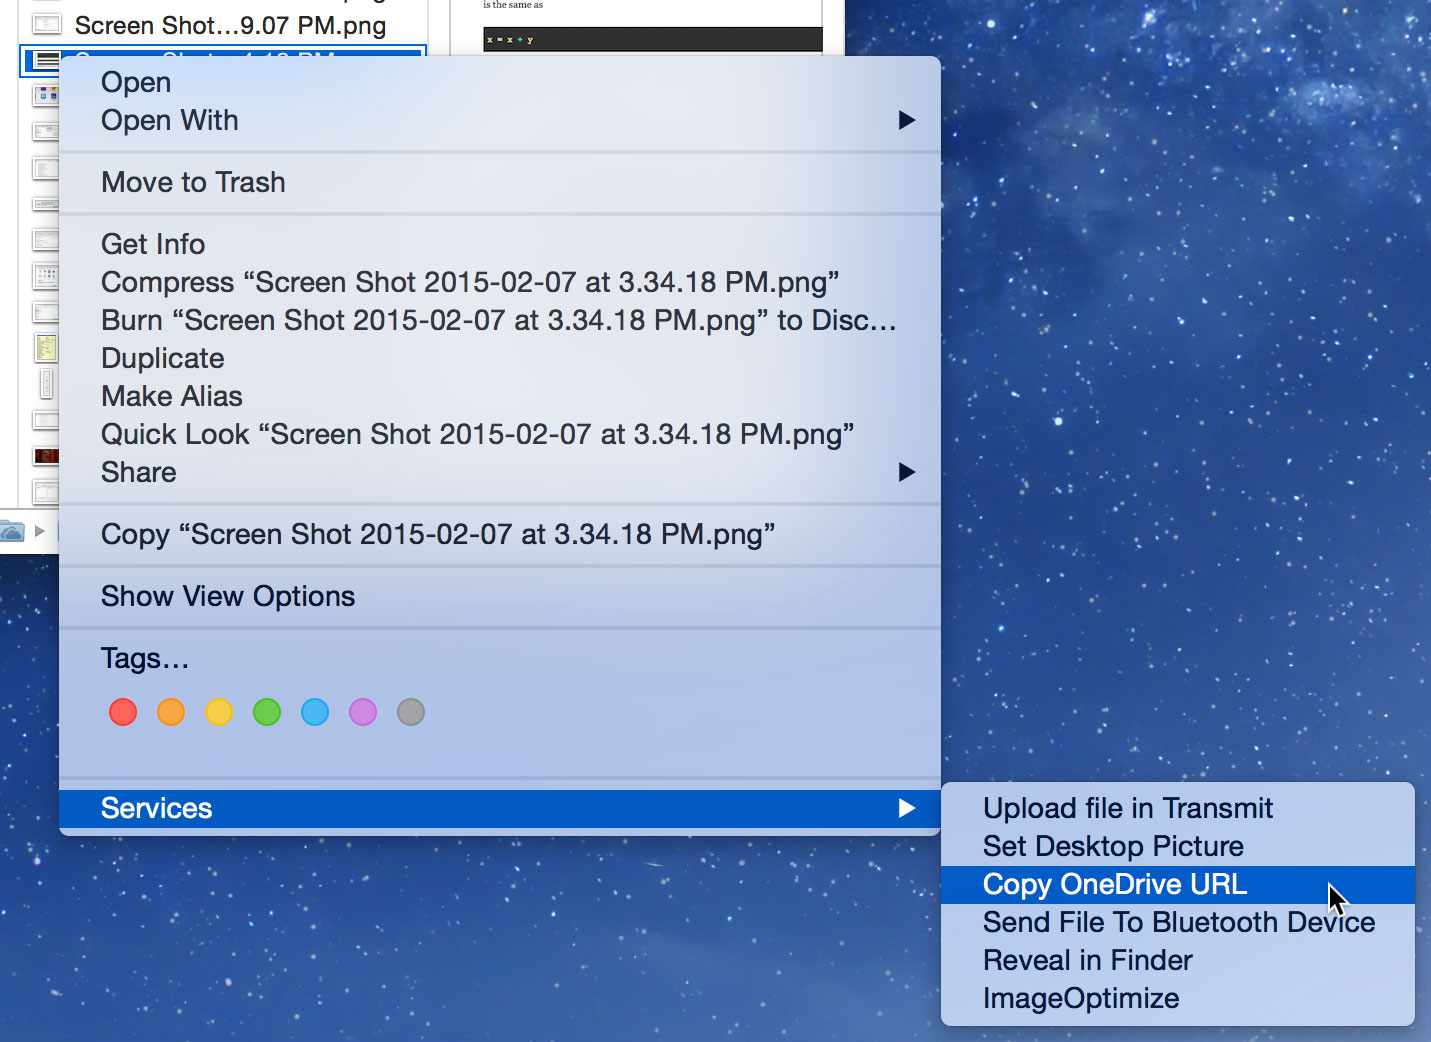
Creating a “Copy OneDrive URL” Workflow
This Service workflow adds a “Copy OneDrive URL” item to the context menu of your currently-selected file in Finder. This lets you easily copy the URL of any file or folder in your OneDriveBusiness folder, not just “Shared With Everyone” or “Screenshots” files.[8]
In Automator.app create a new Service.

In the newly-created service workflow, do the following:
- Change the Service receives selected dropdown to “files or folders”.
- Change the application dropdown from “any application” to “Finder.app”.
Now repeat steps 3 - 7 from the folder action workflow above and you should end up with something like this:

Save the action as something like “Copy OneDrive URL”, and it should become available immediately. Right(or Ctrl)-click on a file inside your OneDriveBusiness folder in Finder. If you don’t have many other file-accepting services enabled for the selected file’s type, this context menu should contain an item near the bottom labeled “Copy OneDrive URL” that invokes the workflow you just created.

However if you have more than 4 or 5 installed services associated with a selected file’s type, the menu item might get shoved into a less-convenient Services submenu.
Conclusion
Microsoft will probably get around to adding these features eventually, but hopefully these Automator workflows will help tide you over until then.
-
It wasn’t clear during the install process, but the folder you pick is the folder that the “OneDriveBusiness” sync folder will be created inside of. I was a little worried it would just start syncing my entire Documents folder, virtual machines and all, but it did not. ↩
-
If you’re not OK with anyone in your company smart enough to guess your URL being able to see your Shared with Everyone files, you will have to adjust these instructions and the script to work with another folder that you’ve set special permissions on. This is left as an exercise for the reader. ↩
-
Make sure you either keep the double quotes around the path or you escape all the spaces in “Shared with Everyone” with backslashes, else bash will get totally confused and your screenshots will still be sent to the Desktop without providing you any errors. ↩
-
Those are just terms I made up. ↩
-
This seems to be the user’s email address with all special characters replaced with underscores, i.e. the user’s email address is “[email protected]”. ↩
-
One of the biggest frustrations I’ve had with the Dropbox screenshots functionality is that it doesn’t have a 1 or 0-click way to open the new image locally for annotation and editing. You have to locate it in Finder yourself. I thought it would be really handy to have this workflow open the image for me. Half of the time it’s very useful; the other half it’s annoying. I might change mine to a Reveal Finder Items action someday. ↩
-
It would be nice if the Automator workflow could know when OneDrive is done syncing, so maybe it could play a sound to let you know, but I haven’t found a way to do that. ↩
-
It’s up to you to set the correct permissions for anything outside of “Shared With Everyone” so the URL works for who you intend. ↩